Bathtub Refinishing in Schaumburg, IL: Costs, Process & Local Guide [2026]
April 22, 2026Bathtub Refinishing Pros and Cons: The Full Breakdown for Chicago Homeowners [2026]
May 4, 2026
How to Fix a Chipped Bathtub (And When a DIY Kit Won’t Cut It)
Key Takeaways
- Small chips (under 1 inch): DIY repair kits cost $10–$35 and take 30–60 minutes plus 24-hour cure time
- Multiple chips or deep gouges: Professional chip repair costs $150–$300 for up to 5 chips
- Widespread damage: Full bathtub refinishing ($350–$600) creates a new surface over everything
- Steel/cast iron tubs: Fix chips immediately to prevent rust spreading beneath the enamel
- Break-even point: At 4+ chips, professional refinishing costs less per chip than individual repairs
What Actually Causes Bathtub Chips?
Chips happen for five specific reasons, and identifying the cause determines whether a simple patch will hold or whether you’re treating a symptom of a bigger problem.
Impact damage is the most common cause. Dropping a shampoo bottle, a metal razor, or a ceramic soap dish onto a porcelain enamel surface creates a point-impact fracture. Porcelain enamel is essentially glass fused to metal at 1,400°F. It’s hard but brittle, and a dropped object concentrates force on a tiny area. These chips are usually clean-edged and circular, and they respond well to DIY repair.
Chemical erosion from harsh cleaners is the second most common cause. Acidic drain cleaners (sulfuric acid formulas), abrasive powders like Comet or Ajax, and even some “natural” cleaners with high citric acid concentrations slowly dissolve the enamel glaze. The result is a roughened area that chips more easily under normal use. If you’re seeing chips in areas where water pools or where you typically pour cleaner, chemical damage is likely involved.
Age-related wear affects tubs over 25–30 years old. The enamel coating gradually thins from decades of thermal cycling (hot water expanding and cooling the metal substrate) and normal abrasion. Once the enamel thins below a critical threshold, chips start appearing from everyday contact that wouldn’t have caused damage when the tub was newer.
Improper previous refinishing is a frequently overlooked cause. If a tub was refinished with a low-quality coating or without proper surface preparation, the new finish can chip, peel, and flake within 2–5 years. These chips look different from original enamel chips. They tend to have visible layers, peeling edges, and often expose a different-colored layer underneath.
Structural flex affects fiberglass and thin acrylic tubs, particularly cheaper builder-grade models. If the tub doesn’t have adequate support underneath, it flexes when someone stands in it. That flex creates micro-cracks at stress points (usually near the drain and along the floor edges) that eventually chip away.
Can You Fix a Chipped Tub Yourself? The Honest Assessment
Yes, but with significant caveats. DIY chip repair works for isolated, clean-edged chips smaller than a quarter (approximately 1 inch across) on surfaces that are otherwise in good condition. The repair involves filling the chip with a color-matched epoxy or enamel compound, sanding it flush, and letting it cure.
Where DIY repair consistently fails, based on community feedback from home improvement forums and professional refinishers’ observations:
| Failure Mode | Why It Happens | Frequency |
|---|---|---|
| Color mismatch | Kit colors are generic; older tubs yellow with age, making “white” patches visible | Very common |
| Patch peeling within 6 months | Inadequate surface prep or moisture in the chip area during application | Common |
| Rough texture | Over-sanding or under-sanding the cured epoxy leaves a visible bump or divot | Common |
| Rust bleeding through | Rust wasn’t fully removed before patching; continues corroding under the epoxy | Moderate (steel/iron tubs) |
| Multiple patches looking worse than the chip | Each patch is slightly different in color and texture, creating a patchwork appearance | Common with 3+ repairs |
The core problem isn’t the repair kits themselves. It’s that most homeowners underestimate the surface preparation required. Professional refinishers spend more time prepping the surface (cleaning, etching, priming) than applying the actual coating. A DIY repair kit gives you the filler material but not the preparation expertise that makes it bond permanently.
Step-by-Step: Fixing a Small Chip the Right Way
If you have a single clean chip under 1 inch on an otherwise healthy tub, here’s the process that gives you the best chance of a lasting repair. This applies to porcelain enamel, cast iron, and steel tubs. Fiberglass and acrylic tubs require different products (see the material-specific section below).
Materials needed: Two-part epoxy repair kit matched to your tub material ($15–$30), 400-grit and 600-grit wet/dry sandpaper, acetone or rubbing alcohol, painter’s tape, disposable gloves, and a small artist’s brush or the applicator included in the kit.
Step 1: Clean aggressively. Scrub the chipped area and surrounding 2 inches with acetone or rubbing alcohol. You’re removing body oils, soap residue, and any loose material. If there’s rust in the chip (orange or brown discoloration), apply a rust converter product first and let it dry per the label directions. This step alone determines whether your repair lasts 6 months or 6 years.
Step 2: Sand the inside of the chip. Use 400-grit sandpaper to lightly roughen the inside of the chip and the edges. This creates tooth for the epoxy to grip. Wipe away dust with a tack cloth or damp paper towel, then let dry completely.
Step 3: Tape off the area. Place painter’s tape around the chip, leaving about a quarter-inch border. This keeps the repair compound confined and gives you a cleaner edge.
Step 4: Mix and apply the epoxy. Follow the kit’s mixing ratio exactly. Most two-part epoxies have a working time of 5–10 minutes before they start setting. Apply the mixture into the chip in thin layers, building up slightly above the surface. It’s easier to sand down excess than to fill a depression later.
Step 5: Cure fully. Let the repair cure for the full recommended time, usually 24 hours at room temperature above 65°F. Do not use the tub during this period. Humidity above 60% can extend cure time. This is the step most people rush, and it’s why patches fail.
Step 6: Sand flush. Once fully cured, wet-sand with 600-grit sandpaper using gentle circular motions until the patch is flush with the surrounding surface. Finish with 1000-grit if you want a smoother result.
How Repair Approaches Differ by Tub Material
Not every tub chips the same way, and repair products are not interchangeable across materials. Using the wrong product on the wrong material is one of the most common reasons DIY repairs fail.
| Material | Chip Characteristics | Correct Repair Product | Common Mistake |
|---|---|---|---|
| Porcelain enamel on cast iron | Clean break, dark metal visible underneath | Porcelain-specific epoxy (e.g., Porc-a-fix) | Using acrylic filler, which won’t bond to enamel |
| Porcelain enamel on steel | Similar to cast iron but thinner; may flex | Porcelain epoxy + rust converter if any orange visible | Skipping rust treatment; rust spreads under patch |
| Fiberglass | Spiderweb cracks radiating from impact; may be soft around edges | Fiberglass repair kit with resin and hardener | Using porcelain epoxy, which is too rigid for flexible fiberglass |
| Acrylic | Clean chip, white or cream substrate visible | Acrylic-specific filler or solvent-based acrylic repair | Over-sanding, which creates a dull spot that’s impossible to polish out |
| Previously refinished tub | Peeling layers, multiple colors visible in cross-section | Full re-refinishing (patch repair won’t hold on failed coatings) | Patching over a failed refinishing job; new patch peels too |
How to identify your tub material: Tap the side with your knuckle. Cast iron produces a deep, resonant ring and feels cold. Steel produces a thinner, higher-pitched sound. Fiberglass sounds hollow and flexes slightly under pressure. Acrylic also sounds hollow but feels warmer to the touch and is typically thicker than fiberglass. If you see layers peeling in the chip, you have a previously refinished tub.
Our Analysis: When DIY Repair Costs More Than Professional Help
We cross-referenced pricing from 8 repair kit brands, 6 Chicago-area refinishing companies, and national cost databases to build this break-even comparison. The math reveals that DIY stops being the cheaper option faster than most people assume.
| Scenario | DIY Cost | Professional Cost | Better Value |
|---|---|---|---|
| 1 small chip, good tub condition | $15–$35 (kit) | $150–$200 | DIY |
| 2–3 chips, good tub condition | $15–$35 (same kit) | $195–$300 | DIY (but color matching gets harder) |
| 4+ chips or deep gouges | $35–$80 (multiple kits) | $350–$600 (full refinishing) | Professional refinishing |
| Chips + widespread surface wear | $30–$150 (refinishing kit) | $350–$600 (professional refinishing) | Professional (DIY refinishing kits have high failure rates) |
| Chips + rust + structural issues | Not recommended | $350–$600 (refinishing) or $1,500–$5,000+ (replacement) | Professional assessment needed |
The hidden cost of failed DIY: When a DIY patch fails after 6 months, you’ve spent $15–$35 on materials plus 2+ hours of labor, and you still need professional repair. Worse, some repair compounds leave residue that professional refinishers have to remove before they can work, which can add $50–$100 to the professional job. The cheapest path isn’t always the one that starts cheapest.
When Chip Repair Isn’t Enough: Signs Your Tub Needs Full Refinishing
A chip is sometimes just a chip. But sometimes it’s the first visible sign that the tub’s surface is failing across the board. Here’s how to tell the difference.
The tub has more than 4–5 chips. Multiple chips usually indicate the enamel is thinning systemically, not just failing at impact points. Patching each one individually creates a patchwork surface that looks worse than the chips did.
You see rust staining beyond the chip borders. If orange or brown discoloration extends more than an inch beyond the chip edge, moisture has been reaching the metal substrate for a while. The rust is likely spreading underneath intact-looking enamel, and patching the visible chip won’t stop it.
The surface feels rough even in unchipped areas. Run your hand along the bottom and sides of the tub. If the surface feels grainy, scratched, or rough where there are no visible chips, the protective glaze is worn thin. New chips will keep appearing even after you repair the current ones.
Previous repair patches are failing. If you or a previous owner already patched chips and those patches are now lifting, discoloring, or cracking, the underlying surface isn’t holding adhesion. More patches will just fail the same way.
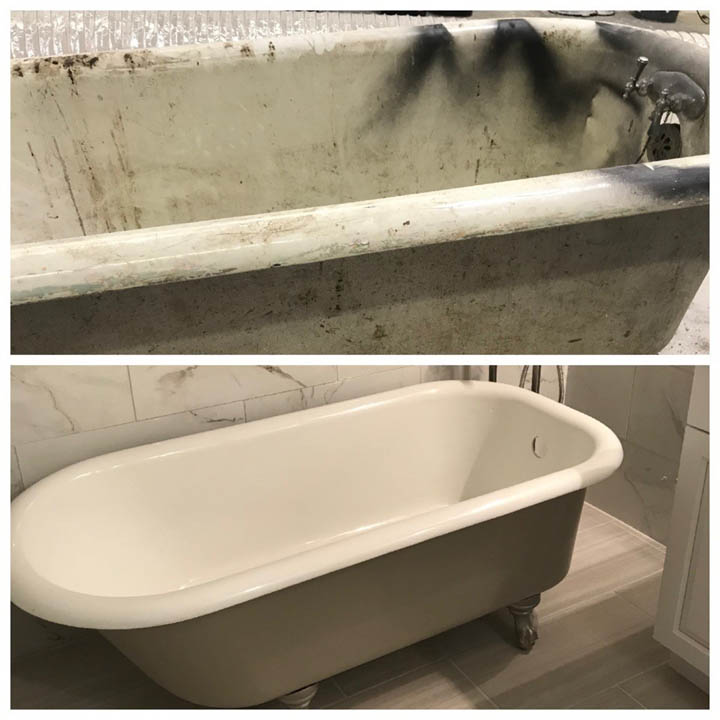
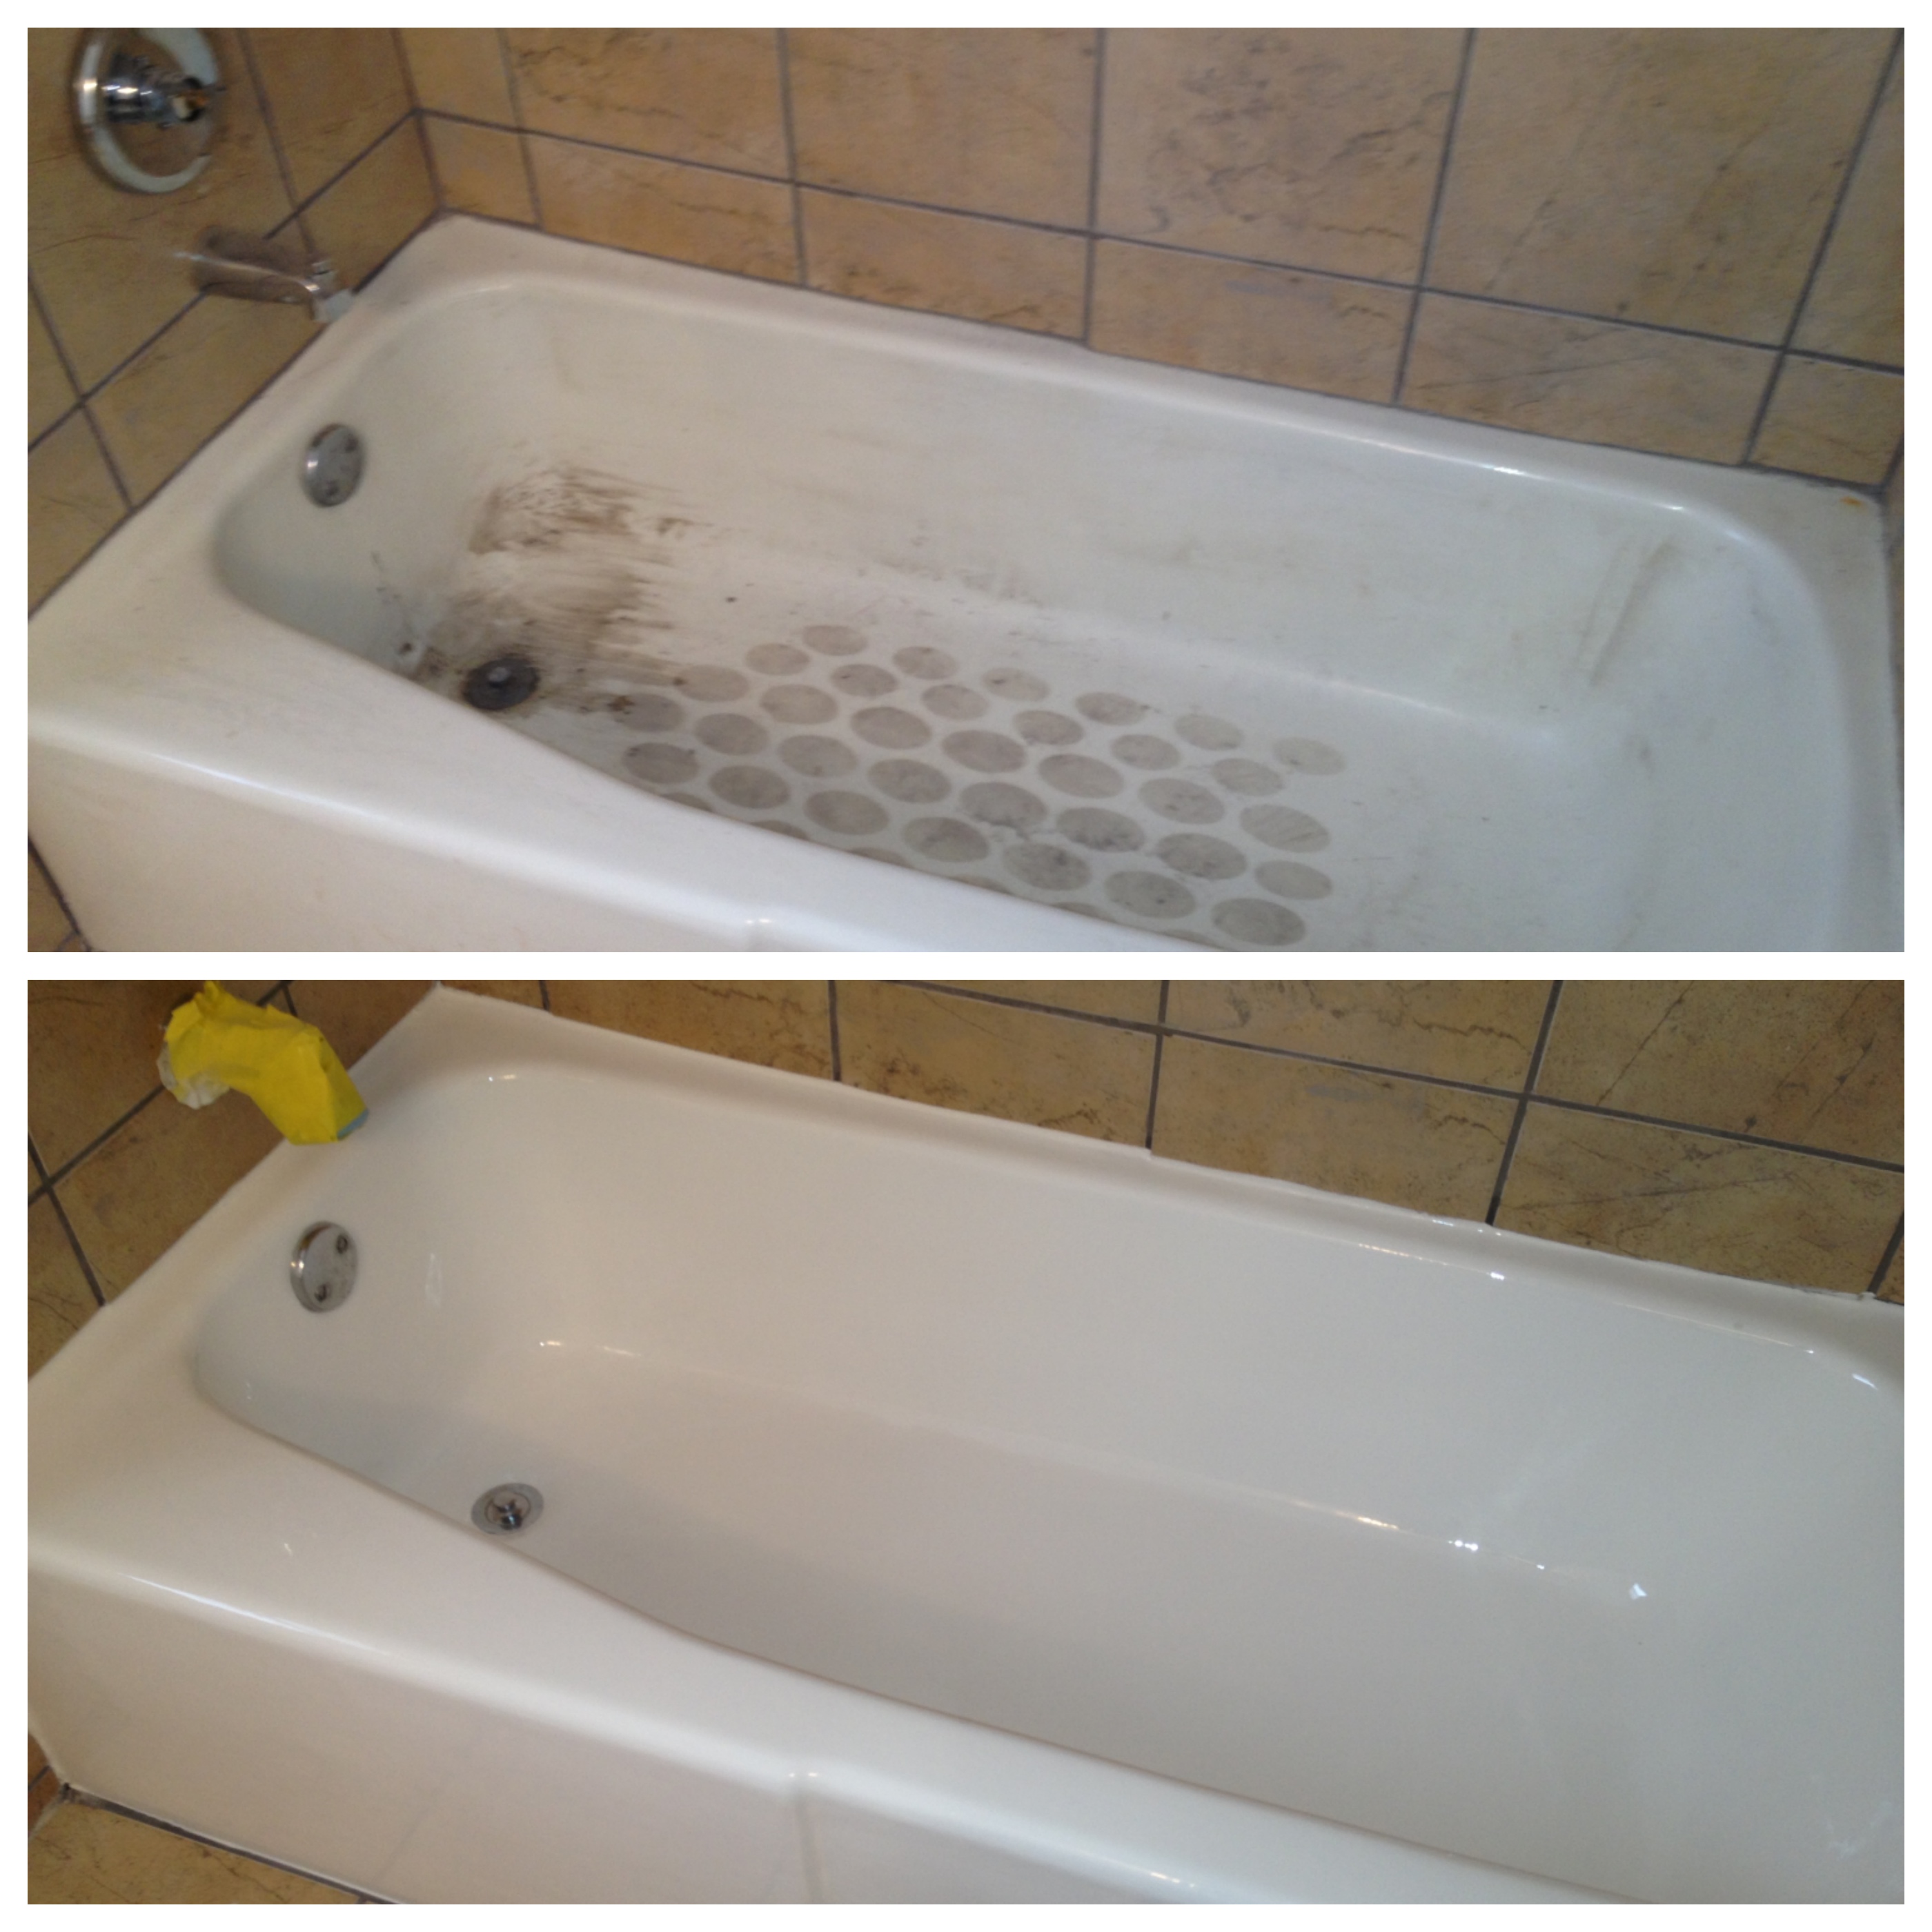
The tub is over 25 years old with heavy daily use. Chicago-area homes built between the 1950s and 1980s typically have porcelain-on-cast-iron tubs that were built to last but have simply outlived their original enamel coating. These tubs are excellent candidates for professional refinishing because the cast iron base is essentially indestructible.
Full refinishing creates an entirely new surface over the existing tub. A professional applies an industrial-grade acrylic urethane or epoxy coating that covers all chips, stains, and wear simultaneously. The result is a smooth, high-gloss finish that looks and performs like a new tub at a fraction of the replacement cost. Companies like Aarco Baths, which has been refinishing tubs in the Chicago area since 1963, typically complete the entire process in 3–4 hours with a 24-hour cure time.
Preventing Future Chips: What Actually Works
Once you’ve repaired or refinished your tub, these precautions prevent repeat damage:
Use a rubber bath mat during showers and baths. The mat absorbs impact from dropped items, which is the number one cause of enamel chips. Choose a mat with suction cups that won’t trap moisture underneath.
Switch to non-abrasive cleaners. Replace powdered cleansers (Comet, Ajax, Bar Keepers Friend powder) with liquid bathroom cleaners or baking soda paste. For refinished tubs, use only the cleaner recommended by your refinishing company. Aarco Baths recommends simply wiping down their refinished surfaces with a soft sponge and mild soap, avoiding anything abrasive.
Never use acidic drain cleaners. Sulfuric acid and hydrochloric acid formulas damage both original enamel and refinished coatings. Use enzymatic drain cleaners or a drain snake instead.
Install a shower caddy to keep bottles off the tub ledge. Corner caddies with tension poles or wall-mounted organizers eliminate the bottle-dropping problem entirely. This one change prevents more chips than any other precaution.
Address new chips immediately. A fresh chip on a steel or cast iron tub can begin rusting within two weeks. Even a quick coat of clear nail polish over the exposed metal buys you time until you can do a proper repair.
Frequently Asked Questions
How long does a DIY bathtub chip repair last?
A properly applied epoxy chip repair on a clean, dry surface typically lasts 2–5 years for small chips. Larger repairs and those on frequently used surfaces (tub floor near the drain) tend to fail sooner because they’re subjected to standing water, thermal cycling, and foot traffic. Professional chip repairs and full refinishing last significantly longer, often 10–15 years, because industrial coatings are more durable and the surface preparation is more thorough.
Can I use my bathtub the same day I repair a chip?
No. Most epoxy repair compounds require a full 24-hour cure time at temperatures above 65°F. Using the tub before the repair fully cures is the most common reason patches fail. Some premium kits claim 4–6 hour cure times, but allowing the full 24 hours improves adhesion and durability significantly. If you’re having professional work done, companies like Aarco Baths also recommend a 24-hour cure period before normal use.
Is it worth repairing a chip, or should I just replace the tub?
For a single chip on an otherwise sound tub, repair is almost always worth it. Even professional chip repair at $150–$300 is a fraction of tub replacement, which runs $1,500–$5,000+ including removal, plumbing, and installation. Full refinishing at $350–$600 is the sweet spot for tubs with multiple chips or surface wear: you get a completely new surface for about 10–20% of replacement cost. Replacement only makes sense when the tub has structural damage (cracks through the substrate, visible holes, or severe warping).
Why did my previous chip repair turn yellow?
Most DIY repair kits use epoxy compounds that are not UV-stable. Over time, exposure to bathroom lighting (especially fluorescent and some LED fixtures) causes the epoxy to yellow. The original tub surface may also continue to change color with age, making the patch more noticeable over time. Professional refinishing coatings typically include UV inhibitors that resist yellowing for 10+ years.
Can a refinishing company fix chips as part of a full refinishing job?
Yes. Professional refinishing includes chip and crack repair as part of the surface preparation process. The technician fills all chips, smooths them, and then applies the new coating over the entire surface. This eliminates individual chip repairs completely and creates a uniform finish. It’s typically the most cost-effective approach for tubs with three or more chips.
Chicago-Area Homeowners: Why Your Tub Material Matters
The Chicago metropolitan area has a distinctive housing stock that affects bathtub repair decisions. Homes built from the 1920s through the 1960s across neighborhoods like Lincoln Park, Ravenswood, and the western suburbs (Elmhurst, Oak Park, Berwyn) typically have heavy porcelain-on-cast-iron tubs. These tubs weigh 300–400 pounds and are built to last indefinitely, but their enamel coatings were never designed to last 60–100 years. The cast iron base is almost certainly fine; the enamel surface is what’s failing.
Ranch homes and split-levels from the 1970s–1990s in suburbs like Naperville, Schaumburg, and Arlington Heights more commonly have steel or fiberglass tubs. These are lighter and more affordable but also more prone to flex-related chipping and surface degradation.
For either type, professional refinishing is often the most practical solution in the Chicago area because it avoids the complications and cost of full bathroom renovation. Removing a 350-pound cast iron tub from a second-floor bathroom in a 1940s bungalow isn’t just expensive; it’s a demolition project that risks damaging the surrounding tile, plumbing, and floor joists. Refinishing the tub in place eliminates all of that.
Aarco Baths has been serving the greater Chicago area from their Elmhurst location since 1963, with residential bathtub refinishing as their core specialty. Their process includes chip and crack repair as part of the refinishing preparation, and all work comes with a 10-year guarantee. You can request a free estimate or view examples in their project gallery.