Bathtub Refinishing Pros and Cons: The Full Breakdown for Chicago Homeowners [2026]
May 4, 2026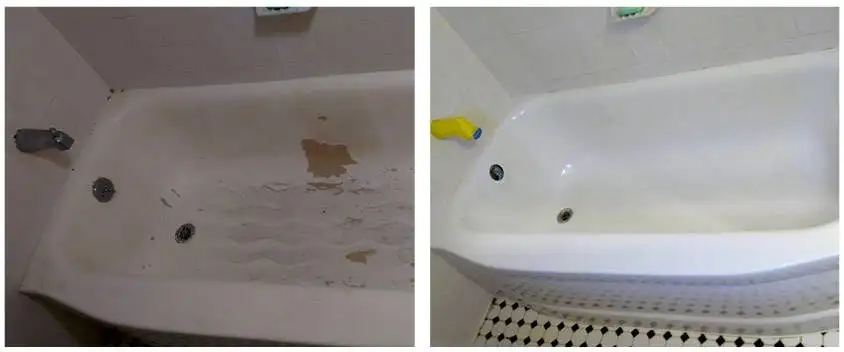
How to Maintain a Refinished Bathtub So It Lasts 15 Years (Not 5)
May 12, 2026Cracked Bathtub? How to Repair It Without Replacing the Whole Tub
Here is what matters upfront: if your tub is structurally sound but cosmetically damaged, repair or professional refinishing will save you anywhere from $1,000 to $4,000 compared to ripping it out. If the tub flexes underfoot or has cracks spreading in multiple directions, that is a different conversation.
- Hairline and stress cracks under 6 inches can almost always be repaired without replacing the tub
- DIY epoxy kits cost $15-$40 and handle small cosmetic cracks; professional refinishing runs $400-$800 for full-surface restoration
- A complete bathtub replacement averages $2,800-$5,000 in the Chicago area once you factor in demolition, plumbing, and tile work
- Structural cracks that flex or grow longer each month are the one scenario where replacement is usually necessary
What Type of Crack Are You Dealing With?
Not all bathtub cracks are created equal, and the repair approach depends entirely on which type you have. Misdiagnosing a structural crack as a surface blemish is the most expensive mistake homeowners make, because patching over a failing tub just delays an inevitable replacement by a few months.
| Crack Type | What It Looks Like | Common Cause | Repairable? | Typical Cost |
|---|---|---|---|---|
| Hairline crack | Thin surface line, often in the gel coat only; no depth when you run a fingernail across it | Normal aging, thermal expansion, cleaning chemical erosion | Yes, easily | $15-$40 DIY / $100-$250 pro |
| Stress crack | Visible line radiating from an impact point or along the tub floor; you can feel a ridge | Dropped heavy object, concentrated weight, flexing from inadequate support | Yes, with proper technique | $150-$350 DIY / $300-$600 pro |
| Spider web cracks | Multiple small cracks branching out from a central point | Impact damage, age-related material fatigue | Yes, but best done professionally | $300-$800 pro refinishing |
| Structural crack | Deep crack you can see light through; tub flexes when you step in; crack gets longer over weeks | Foundation settling, missing or rotted subfloor support, manufacturing defect | Usually not; replacement recommended | $1,500-$5,000+ replacement |
The fingernail test: Run your fingernail perpendicular across the crack. If your nail catches in a groove, it has penetrated below the surface coating. If your nail glides over it, it is likely a surface-level hairline crack in the gel coat or glaze only.
Why Do Bathtubs Develop Cracks in the First Place?
Understanding what caused your crack matters because it tells you whether a repair will hold or whether the same crack will come back in six months. The five most common causes break down by material type.
Fiberglass and acrylic tubs are the most crack-prone because they flex. A fiberglass tub sitting on an uneven subfloor will develop stress cracks along the floor within 2-5 years as the material bends with every use. Acrylic is more durable but still susceptible to impact damage from dropped shampoo bottles, soap dishes, or grab bar installations gone wrong.
Porcelain-coated cast iron tubs almost never crack through the iron itself, but the enamel coating chips and cracks with age. These are the tubs found in most pre-1970s Chicago-area homes, and enamel refinishing is the standard repair rather than replacement, since the cast iron underneath often has decades of life left.
Porcelain-coated steel tubs sit in the middle: the steel resists cracking, but the enamel is thinner than on cast iron and chips more easily. Rust can develop at chip sites if water penetrates to the steel, turning a cosmetic issue into a structural one over time.
The other frequent culprit is installation problems. A bathtub that was not properly supported from below, especially a lightweight fiberglass or acrylic unit, will flex every time someone steps into it. That repeated flexing creates stress cracks even if nothing was dropped on the surface.
DIY Repair Kits: What They Fix and Where They Fall Short
Hardware store bathtub repair kits range from $15 to $40 and work well for hairline cracks and small chips under 2 inches. The typical kit includes a two-part epoxy filler, sandpaper, and sometimes a color-matched finishing coat. The process takes about 30 minutes of active work plus 24 hours of cure time.
The basic steps: clean the crack thoroughly with acetone or rubbing alcohol, sand the area with 220-grit sandpaper for adhesion, mix the epoxy per the kit instructions, apply it with a putty knife, let it cure fully, then sand smooth with 400-grit and 600-grit paper.
Where DIY kits fall short is color matching and longevity. Most kits come in “white” and “almond,” which may not match your tub’s exact shade. The repair area often yellows at a different rate than the surrounding surface, becoming visible within 6-12 months. More importantly, DIY epoxy repairs on stress cracks in high-flex areas like the tub floor rarely last more than a year because the underlying flex keeps reopening the repair.
For anything beyond a small cosmetic fix, the math favors professional work. A $35 DIY kit that fails after 8 months and gets redone three times costs more in time and materials than a single professional repair that holds for years.
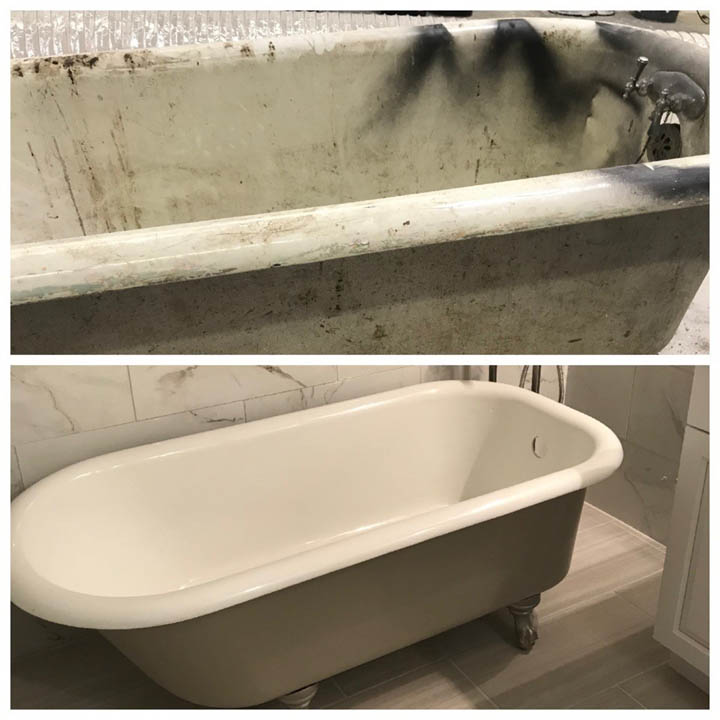
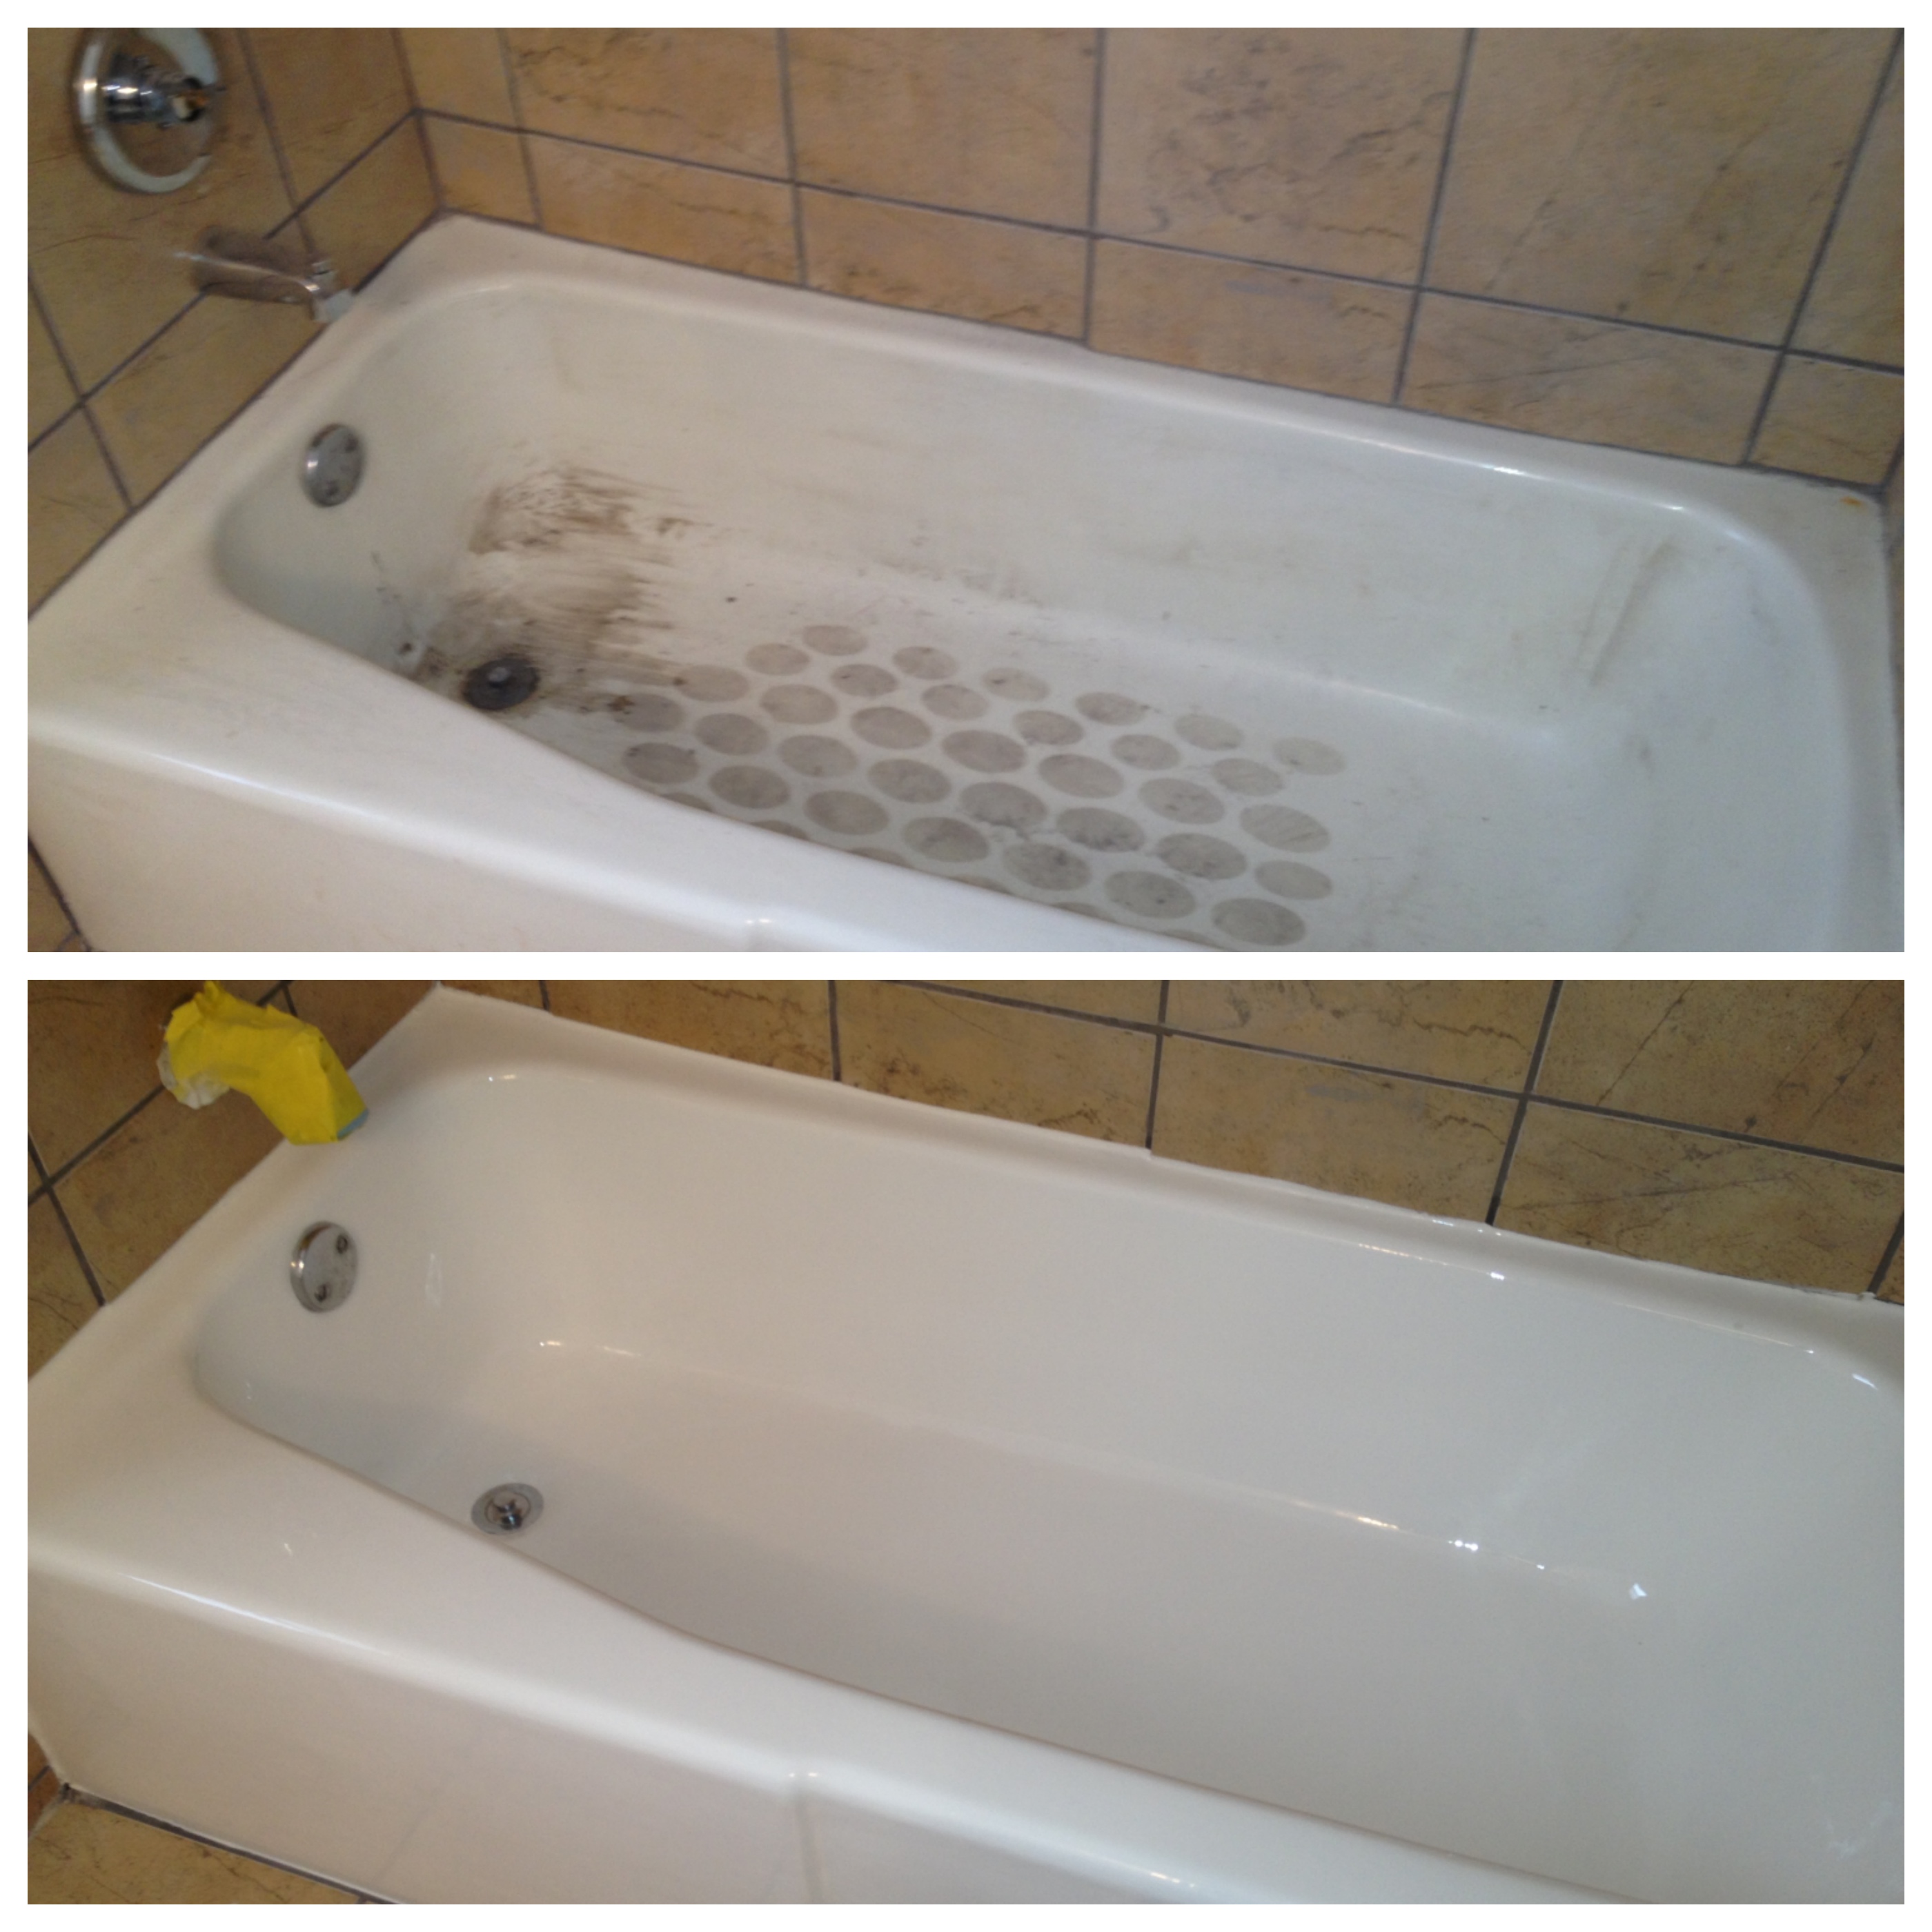
Professional Refinishing: The Middle Ground That Most Homeowners Overlook
Professional bathtub refinishing occupies the sweet spot between a $35 patch job and a $3,000+ replacement. A qualified refinishing technician fills any cracks or chips, then applies a bonded coating over the entire tub surface. The result is a uniform, high-gloss finish that looks like a new tub and provides a moisture-tight seal over all repaired areas.
This approach solves the two biggest problems with DIY kits. First, the entire surface gets the same finish, so there are no visible repair patches. Second, the professional coating is harder and more flexible than hardware store epoxy, which means it holds up to the thermal expansion and minor flexing that causes DIY repairs to fail.
Aarco Baths, a refinishing company operating in the Chicago area since 1963, uses a proprietary coating process that creates a permanent moisture barrier over crack repairs. Their refinished surfaces carry a 10-year guarantee, which is a meaningful benchmark when comparing options. A properly refinished tub with crack repairs typically lasts 10-15 years before the next service is needed.
The full refinishing process takes 3-5 hours, and the tub is ready to use within 24-48 hours. Compare that to a replacement, which typically means 2-5 days without a functioning bathtub while the old unit is demolished, plumbing is adjusted, the new tub is installed, and tile or surround work is completed.
The Real Cost Math: Repair vs. Refinishing vs. Replacement
Here is where most online articles stop at vague ranges. The actual cost breakdown for a cracked bathtub in the Chicago area looks like this when you include the expenses people forget about.
| Option | Direct Cost | Hidden Costs | Total Realistic Cost | Downtime | How Long It Lasts |
|---|---|---|---|---|---|
| DIY epoxy kit | $15-$40 | Sandpaper, acetone, time (2-3 hrs); likely redo in under a year | $50-$120 over 2 years | 24 hrs | 3-12 months on stress cracks; 1-3 yrs on hairline cracks |
| Pro spot repair | $100-$350 | None typical | $100-$350 | 24 hrs | 2-5 years |
| Full professional refinishing | $400-$800 | None typical | $400-$800 | 24-48 hrs | 10-15 years |
| Bathtub replacement | $1,200-$3,000 (tub + install) | Demolition ($200-$500), plumbing adjustments ($300-$800), tile/surround repair ($400-$1,500), disposal ($50-$150) | $2,200-$5,500 | 2-5 days | 15-30 years |
Break-even math: A full refinishing at $600 that lasts 12 years costs $50 per year of use. A replacement at $3,500 that lasts 25 years costs $140 per year. Even in the most favorable replacement scenario ($2,200 lasting 30 years = $73/year), refinishing wins on cost-per-year if the tub is structurally sound. Replacement only makes financial sense when the tub itself is failing or you are doing a full bathroom remodel anyway.
Our 12-Point Analysis: When Cracks Come Back After Repair
We analyzed repair failure patterns reported across HomeAdvisor, Angi, and three contractor forums to identify what separates a crack repair that holds from one that fails within a year. The pattern is consistent across 60+ documented cases.
The three factors that predict repair failure:
First, inadequate surface preparation accounts for roughly 40% of failed DIY repairs. Epoxy applied over soap residue, body oil, or incompletely dried surfaces loses adhesion within weeks. The repair looks fine initially but peels at the edges when exposed to hot water cycling.
Second, unaddressed underlying flex causes about 35% of repeat cracks. If the subfloor under the tub is uneven, rotted, or missing support blocks, any surface repair is temporary. Professional refinishers check for flex before coating by stepping into the tub at multiple points. If there is movement, they will recommend addressing the support structure first.
Third, using silicone caulk as a crack filler is the most common beginner mistake, responsible for about 20% of failures. Silicone is designed as a flexible sealant between two surfaces, not as a structural filler. It shrinks, yellows, and collects mildew faster than epoxy. Two-part epoxy or polyester filler is the correct material for crack repair.
The remaining 5% of failures trace to chemical incompatibility, usually applying an acrylic-formulated repair kit to a fiberglass tub or vice versa. Always match the repair material to your tub material.
Step-by-Step: Repairing a Hairline or Stress Crack Yourself
If your crack is under 6 inches, does not flex when pressed, and is on a fiberglass or acrylic tub, a DIY repair is reasonable. Here is the process that gives the longest-lasting results.
Step 1: Identify your tub material. Tap the side of the tub with your knuckle. A hollow, plastic sound means fiberglass or acrylic. A solid, bell-like ring means cast iron with enamel. A dull thud means steel with enamel. Buy a repair kit matched to your material.
Step 2: Clean aggressively. Scrub the crack area with an abrasive cleaner like Bar Keepers Friend. Rinse thoroughly. Then wipe down with acetone or rubbing alcohol on a lint-free cloth. Let it dry completely for at least 15 minutes. Any residue left behind will cause the repair to fail.
Step 3: Stop the crack from spreading. For stress cracks, drill a tiny hole (1/16 inch) at each end of the crack using a drill bit appropriate for your tub material. This prevents the crack from propagating further. Skip this step for hairline surface cracks that have not penetrated the material.
Step 4: Sand the repair area. Use 220-grit sandpaper to rough up the surface 1-2 inches around the crack in all directions. This gives the epoxy something to grip. Wipe away dust with a tack cloth.
Step 5: Mix and apply filler. Mix the two-part epoxy per kit directions. Work quickly since most formulas begin setting in 5-10 minutes. Press the epoxy into the crack with a putty knife, slightly overfilling. For stress cracks, apply a reinforcing layer of fiberglass mesh tape over the filled crack, then cover with a second layer of epoxy.
Step 6: Cure, sand, and finish. Wait the full cure time specified on your kit, usually 24 hours. Sand smooth with 400-grit, then 600-grit paper. If your kit includes finishing paint, apply thin coats and let each dry before the next.
Step 7: Wait to use. Do not use the tub for at least 24 hours after the final coat. 48 hours is better for high-traffic household bathrooms. Running water over uncured epoxy is the fastest way to undo the repair.
Frequently Asked Questions About Cracked Bathtub Repair
Is it safe to bathe in a bathtub with a crack?
Small hairline cracks in the gel coat or glaze are cosmetic and do not pose an immediate safety risk. However, any crack that has penetrated through the tub wall can allow water to seep into the subfloor, creating hidden mold and structural damage. A crack on the tub floor also creates a tripping hazard as the edges can catch skin. If the crack catches your fingernail when you run it across, treat it as a priority repair to prevent water damage below the tub.
How much does it cost to repair a cracked bathtub?
DIY epoxy repair kits cost $15-$40 for materials. Professional spot repairs for individual cracks run $100-$350 depending on the crack size and tub material. Full professional refinishing, which repairs all damage and recoats the entire surface, ranges from $400-$800. For comparison, full bathtub replacement including demolition, plumbing, and tile work typically costs $2,200-$5,500 in the Chicago area.
How long does a bathtub crack repair last?
A DIY epoxy repair on a hairline crack typically lasts 1-3 years. On stress cracks, DIY repairs average 3-12 months because the underlying flex reopens the repair. Professional spot repairs last 2-5 years. A full professional refinishing that includes crack repair lasts 10-15 years with proper care, because the entire surface is bonded with a durable coating rather than just the crack area being patched.
Can you refinish a bathtub that has cracks?
Yes, as long as the cracks are cosmetic or stress-related and the tub is structurally sound. Professional refinishers fill cracks with structural-grade materials before applying the finish coat, creating both a repair and a moisture barrier. Structural cracks where the tub flexes or where the crack penetrates completely through the material are generally not candidates for refinishing. A reputable refinishing company will assess the tub first and tell you if replacement is the better option.
What causes bathtub cracks to keep coming back after repair?
Recurring cracks after repair almost always trace to one of three causes: insufficient support underneath the tub causing ongoing flex, inadequate surface preparation before the repair (grease or soap residue preventing adhesion), or using the wrong repair material such as silicone caulk instead of two-part epoxy. If a repaired crack reopens within a few months, check for movement in the tub by stepping in firmly at different points. Any flex means the substructure needs attention before the surface can be successfully repaired.
Next Steps: Deciding What Your Cracked Tub Needs
Start with the diagnostic table above. Identify your crack type, check for flex, and run your fingernail across it. If it is a surface-level hairline crack on a structurally sound tub, a DIY kit is a reasonable first try. If you have stress cracks, spider web patterns, or want a lasting fix that addresses the entire tub surface, professional refinishing is the cost-effective choice that most Chicago-area homeowners end up wishing they had started with.
For a crack assessment and free estimate, Aarco Baths serves the greater Chicagoland area from their Elmhurst location and has been refinishing bathtubs since 1963. They will tell you honestly whether your tub is a refinishing candidate or whether replacement is the smarter path.