Rusty Bathtub Repair Options: A Complete Guide to Fixing Rust Before It Gets Worse
May 14, 2026
Old Bathtub Looks Dirty No Matter What? Here’s Why (And How to Fix It)
May 16, 2026
Refinishing a Clawfoot Tub: What It Actually Costs, How the Process Works, and When It Makes Sense
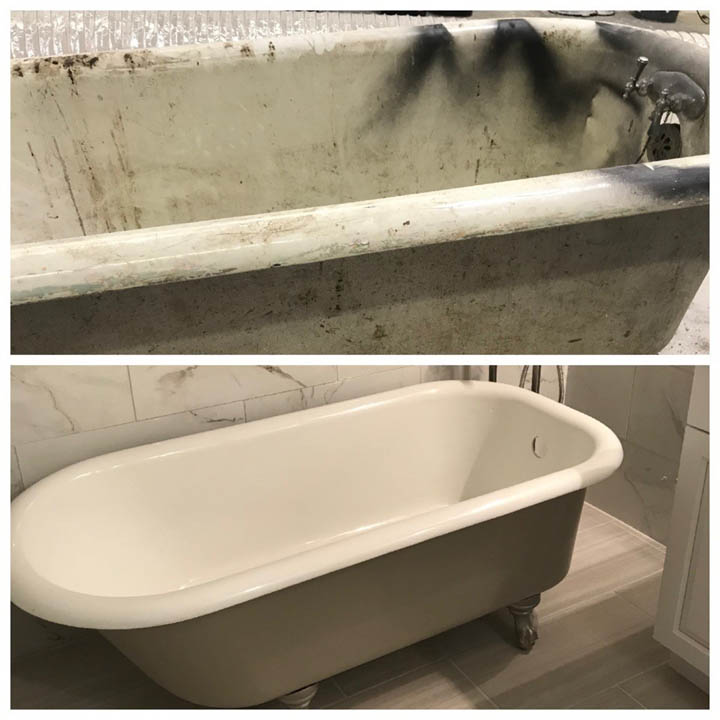
A clawfoot tub is one of the few bathroom fixtures that actually appreciates in character over time. The problem is that the finish does not. After 80 to 140 years of use, most clawfoot tubs have a stained, chipped, or yellowed interior and a rusted, flaking exterior. Replacing one with a comparable new cast iron clawfoot tub runs $1,500 to $5,000 before plumbing and installation. Professional refinishing restores the same tub for a fraction of that cost, preserves the original casting, and finishes in a single day.
This guide covers the full process from interior reglazing to exterior restoration, what drives the price up or down, when refinishing is the wrong call, and the specific challenges that make clawfoot tubs different from standard built-in bathtubs.
- Professional clawfoot tub refinishing costs $500–$1,800 depending on condition and whether you include exterior work.
- Interior reglazing alone runs $350–$700. Adding exterior sandblasting, priming, and painting adds $200–$800+.
- A properly refinished surface lasts 10–15 years and is backed by a warranty from reputable companies.
- Lead paint is common on pre-1978 clawfoot tubs. Testing before any sanding is not optional.
- DIY kits cost $60–$100 but frequently peel or bubble within the first year without proper surface prep.
Why Are Clawfoot Tubs More Expensive to Refinish Than Standard Bathtubs?
A standard built-in bathtub refinishing job typically costs $350–$600. Clawfoot tubs cost more because they present challenges a built-in tub does not. The exterior is fully exposed, meaning it needs its own prep and finish work. The feet have intricate detailing with crevices that trap rust and old paint. And the tub itself must sometimes be moved or tilted to access every surface, which adds labor time.
| Factor | Standard Built-In Tub | Clawfoot Tub |
|---|---|---|
| Interior Reglazing Cost | $350–$600 | $350–$700 |
| Exterior Work Needed? | No (enclosed by walls) | Yes (fully exposed) |
| Exterior Cost | N/A | $200–$800+ |
| Total Professional Cost | $350–$600 | $500–$1,800 |
| Lead Paint Risk | Low (usually enclosed) | High (pre-1978 exterior paint common) |
| Feet/Hardware | None | Require separate sanding, priming, painting |
| Access Difficulty | Easy (fixed position) | Moderate (may need tilting or removal) |
| Typical Time | 3–4 hours | 4–6 hours (interior only); full day with exterior |
The total price depends heavily on whether you need interior only, exterior only, or both. A tub with a sound interior but flaking exterior paint might only need the exterior work. A tub with a stained interior but a recently painted exterior might only need reglazing. Most clawfoot tubs that have not been touched in decades need both.
How Does Professional Interior Reglazing Work on Cast Iron Clawfoot Tubs?
The interior process follows the same general steps as any professional bathtub refinishing, with a few clawfoot-specific adjustments. A professional technician will clean the interior surface with an industrial-grade acid etch to remove soap scum, mineral deposits, and body oils. Next, any chips or cracks are filled with a two-part epoxy filler and sanded smooth. The entire interior surface is then sanded to create a mechanical bond for the new coating.
After prep, the technician applies multiple coats of a high-performance acrylic urethane or catalyzed coating using HVLP spray equipment. This is not the same product found in hardware store kits. Professional coatings are two-component systems that chemically cure to form a hard, glossy surface that resists chipping and yellowing. At Aarco Baths, this process creates a smooth, high-gloss finish with a permanent moisture barrier, backed by a 10-year guarantee.
The refinished interior surface wears the same as a new bathtub. Cleaning requires only a soft sponge and non-abrasive cleaner. Avoid bleach-based products, steel wool, and suction-cup bath mats, which can damage any refinished surface.
What Does Exterior Restoration Involve?
The exterior of a clawfoot tub is a completely separate job from the interior reglazing. Many homeowners do not realize this when getting quotes, and it is the most common source of sticker shock. The exterior process involves three phases: stripping, priming, and painting.
Stripping: The old paint must be fully removed. Professional shops use sandblasting or chemical strippers. Sandblasting is faster and more thorough, but it generates dust and cannot be done in a finished bathroom. If the tub stays in place, chemical stripping and hand sanding are the alternative. This is where lead paint testing matters most. Clawfoot tubs manufactured before 1978 almost certainly have lead-based paint on the exterior. Sanding or sandblasting without testing first creates a serious health hazard, especially in homes with children.
Priming: After stripping, the bare cast iron is primed with a rust-inhibiting metal primer. This step prevents the iron from re-rusting under the new finish. Skip it and you will see rust bleed-through within a year.
Painting: The final coat is typically an oil-based enamel or an exterior-grade paint rated for high-moisture environments. Application by spray gun gives the smoothest, most professional result. Brush or roller application is possible but usually leaves visible texture. Custom colors, metallic finishes, or decorative patterns on the exterior add $100–$300+ to the total.
The Feet Problem: Why Clawfoot Tub Hardware Takes Extra Work
The decorative feet on a clawfoot tub are one of its defining features and one of the most labor-intensive parts to refinish. Ball-and-claw feet, paw feet, and imperial eagle feet all have deep crevices, undercuts, and ornamental detailing that trap decades of rust, old paint, and grime.
Sanding the feet properly requires getting into every crevice, including the backs of the feet that sit against the floor or are partially hidden. A professional will either remove the feet for separate restoration or spend significant time working them in place. Rust on the feet is structural, not just cosmetic. If the foot bolt holes are rusted through, the feet may need welding repair before refinishing.
Some homeowners choose to strip and paint the feet themselves while having the interior professionally reglazed. This is a reasonable compromise if you are comfortable with metalwork. Prime with a rust-converting primer, let it cure fully, then apply two coats of oil-based enamel. Budget 2–3 hours just for the four feet.
Lead Paint on Vintage Clawfoot Tubs: What You Need to Know
This is the safety issue that most online guides gloss over. Any clawfoot tub manufactured or painted before 1978 may have lead-based paint on its exterior. Lead paint on a tub that sits undisturbed is not an immediate hazard. The moment you sand, scrape, or sandblast it, lead dust becomes airborne and settles on every surface in the room.
Before doing any exterior prep work on a pre-1978 clawfoot tub, test the paint. Lead test kits are available at hardware stores for under $15. If the test is positive, lead-safe work practices are required by EPA regulation (the RRP Rule). This means containment, HEPA vacuuming, and proper disposal. A professional refinishing company with RRP certification handles this as part of the job. A DIY approach without proper containment is both illegal and dangerous.
This is especially relevant in Chicago and the surrounding suburbs, where much of the housing stock dates to the 1890s through 1940s. Neighborhoods like Oak Park, Evanston, and the Bungalow Belt have some of the highest concentrations of homes with original clawfoot tubs, and nearly all of them predate the 1978 lead paint ban.
Chicago’s Connection to the Clawfoot Tub: A Manufacturing Legacy
Chicago was not just a city of clawfoot tubs. It was a city that built them. By 1910, the L. Wolff Manufacturing Company on the city’s near west side employed roughly 3,500 workers producing ornate cast iron bathtubs, sinks, and plumbing fixtures. Wolff’s clawfoot tubs were shipped nationwide and featured decorative castings that rivaled fine furniture. The company was one of Chicago’s largest metal-goods employers and a cornerstone of the city’s plumbing hardware industry.
The golden age of the clawfoot tub ran from the 1880s through the 1930s, overlapping precisely with Chicago’s massive residential building boom. Neighborhoods built during this period, including Logan Square, Wicker Park, Humboldt Park, Ravenswood, and much of the South Side, often have original cast iron clawfoot tubs still in place. Many of these tubs have survived because cast iron is nearly indestructible. The finish has not, but the tub itself can be restored to serve another century.
If you own a home in the Chicago area built before 1940 and your bathroom still has the original tub, there is a good chance it was manufactured within 30 miles of where it sits today. Aarco Baths, serving the Chicago area since 1963 from locations in Chicago, Addison, and Naperville, has refinished thousands of these original fixtures over six decades.
Our 12-Point Analysis: What Makes Clawfoot Refinishing More Complex
To quantify the difference between refinishing a clawfoot tub and a standard built-in, we assessed 12 factors that affect job complexity, time, and cost. This analysis reflects patterns observed across thousands of refinishing projects over decades of service in the Chicago market.
| # | Factor | Standard Tub | Clawfoot Tub |
|---|---|---|---|
| 1 | Surface area to prep | Interior only | Interior + full exterior |
| 2 | Lead paint risk | Minimal | High (pre-1978) |
| 3 | Rust severity | Usually surface-level | Often structural on feet/base |
| 4 | Hardware complexity | Standard drain/overflow | Decorative feet, exposed plumbing |
| 5 | Access to all surfaces | Easy (3 walls) | 360-degree access needed |
| 6 | Weight (moving/tilting) | 60–100 lbs | 250–400 lbs |
| 7 | Masking/protection | Walls and fixtures | Floor, walls, and all surrounding surfaces |
| 8 | Coats required | 3–4 interior | 3–4 interior + 2–3 exterior |
| 9 | Cure time | 24–48 hours | 24–48 hours interior; exterior may differ |
| 10 | Custom color demand | Rare | Common (exterior accent colors) |
| 11 | Matching original character | Not applicable | Critical (preserving period authenticity) |
| 12 | Total labor hours | 3–4 hours | 5–8 hours (full restoration) |
The takeaway: clawfoot refinishing is not dramatically harder, but it involves roughly twice the surface area, added safety considerations, and hardware that standard jobs do not encounter. These factors account for the price premium.
DIY Clawfoot Tub Refinishing: Why Most Attempts Fail
Hardware store refinishing kits cost $60–$100 and promise a like-new finish. The reality is less encouraging. The most common failure mode is peeling or bubbling within the first 6–12 months, caused by inadequate surface prep. Proper prep requires acid etching, thorough sanding to create a mechanical bond, and complete degreasing. Most DIY kits include a basic cleaner and sandpaper that cannot match professional-grade preparation.
The coating itself is also different. DIY kits use single-component epoxy that air-dries. Professional coatings are two-component catalyzed systems that chemically cure, creating a harder, more durable finish. The difference in longevity is significant: 1–3 years for a good DIY application versus 10–15 years for professional work.
For the exterior of a clawfoot tub, DIY paint jobs are more viable. Stripping, priming, and painting the outside is essentially metalwork, and a patient homeowner with rust-converting primer and oil-based enamel can achieve a good result. The interior, however, is where professional equipment and materials make the difference between a finish that lasts a decade and one that peels in a year.
How Long Before You Can Use the Tub After Refinishing?
The standard cure time for a professionally refinished clawfoot tub is 24 to 48 hours before you can fill it with water. Some coatings reach full chemical cure in 24 hours; others need the full 48. Your technician will specify the wait time based on the coating used and the ambient temperature. Cooler temperatures slow curing. Do not rush this step. Using the tub before the coating fully cures is the single most common cause of premature finish failure on an otherwise well-done refinishing job.
During the cure period, keep the bathroom ventilated and avoid placing anything on the tub surface. No towels, no bath products, no tools. The surface is chemically active and anything that touches it can leave a permanent mark or compromise adhesion.
Frequently Asked Questions About Clawfoot Tub Refinishing
Can you change the color of a clawfoot tub when refinishing?
Yes. The interior can be finished in white, off-white, almond, or a range of custom colors. The exterior is even more flexible, as it accepts standard paint colors including bold accent tones, metallics, and period-appropriate hues. Many homeowners in older Chicago neighborhoods choose a contrasting exterior color to complement Victorian or Craftsman-style bathrooms.
How do I maintain a refinished clawfoot tub?
Use only non-abrasive cleaners and a soft sponge. Avoid bleach, abrasive powders like Comet or Ajax, steel wool, and suction-cup bath mats. Rinse the tub after each use to prevent soap and mineral buildup. With basic care, a professionally refinished surface lasts 10–15 years.
Is it cheaper to refinish or replace a clawfoot tub?
Refinishing is significantly cheaper. A full professional clawfoot tub refinishing (interior and exterior) costs $500–$1,800. A new reproduction cast iron clawfoot tub costs $1,500–$5,000 for the tub alone, plus $500–$1,500 for plumbing, delivery, and installation. If your existing tub is structurally sound, refinishing saves 60–75% compared to replacement.
Do you need to remove the tub from the bathroom to refinish it?
In most cases, no. Professional technicians refinish the interior in place. Exterior work can also be done in place using chemical strippers and hand sanding instead of sandblasting. Removing a 250–400 pound cast iron tub is a major undertaking that risks damaging floors, doorframes, and the tub itself. Keeping it in place is standard practice.
How can I tell if my clawfoot tub has lead paint?
If the tub or any paint on it dates to before 1978, assume lead is present until proven otherwise. Purchase a lead test kit from any hardware store for under $15. Swab the exterior paint. If the result is positive, do not sand, scrape, or strip without proper containment. Hire a refinishing company with EPA RRP certification to handle the removal safely.